-
Notifications
You must be signed in to change notification settings - Fork 17
Events
The new "Events" feature has been released in Mobile Messaging SDK version 2.4.0 (Huawei SDK 1.0.0). Events are an integration point for our "Moments" engagement platform. They allow you to track arbitrary user actions and collect arbitrary contextual information represented by event key-value properties. The event data collected on our servers might be later used to:
- build segments of recipients for the Flow message campaigns;
- get insights about user behaviour.
Find more info on Infobip docs.
Standard events are enabled for all the Moments users who have Mobile SDK implemented in their mobile app, and you don’t need to perform any additional actions to be able to track them. List of standard events:
- Personalize
- Depersonalize
- Install
- Uninstall
- App Launch
Custom events are those that you have defined yourself and want to track via Mobile SDK.
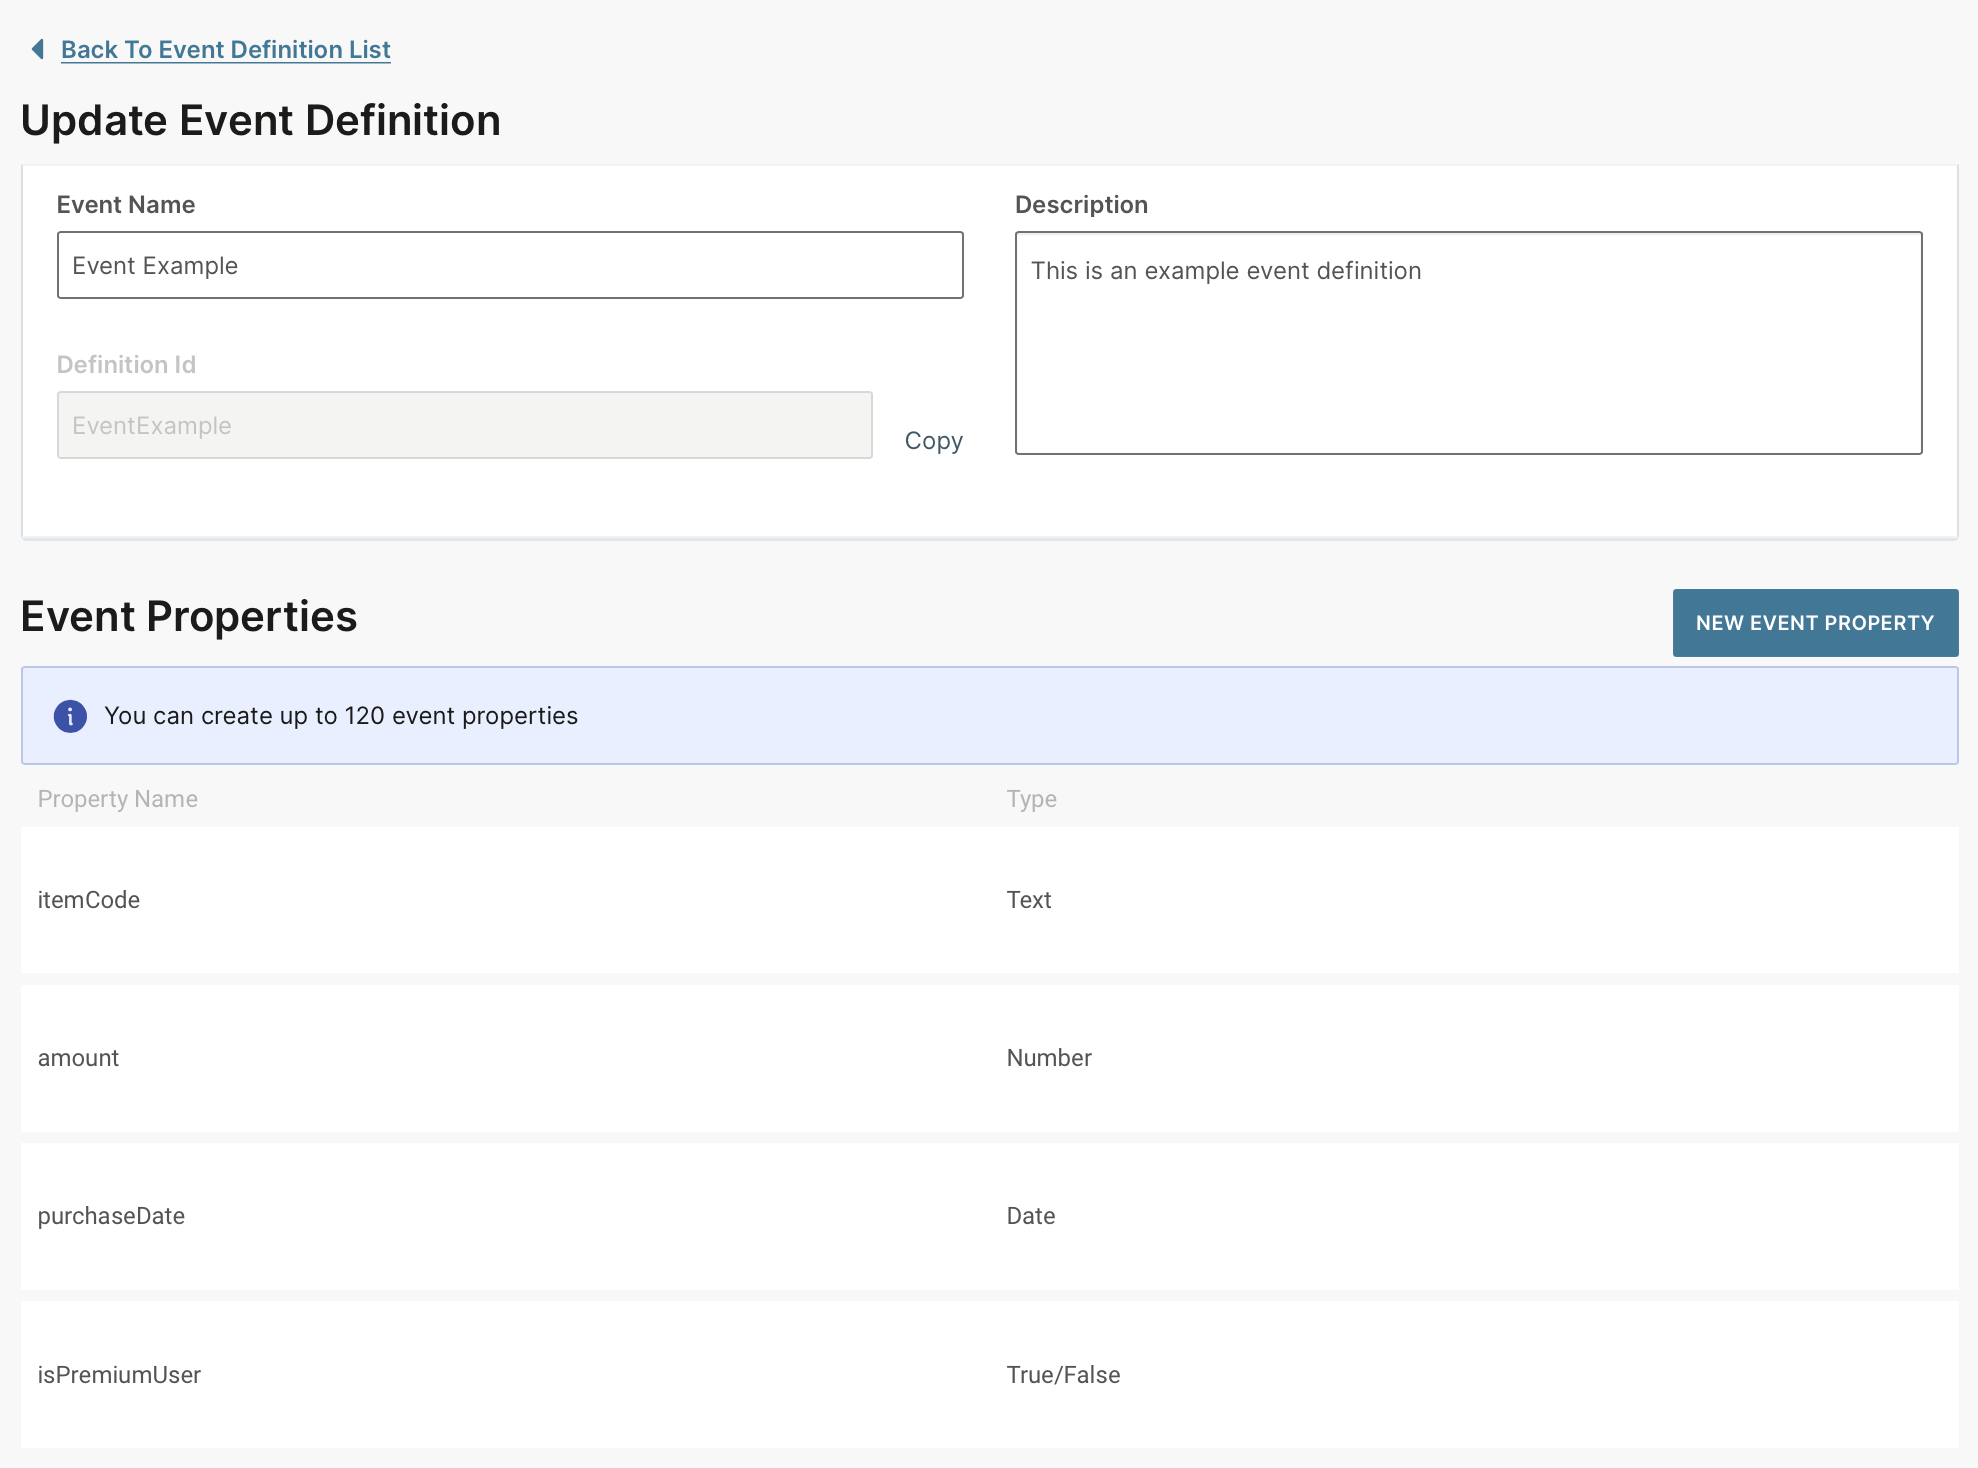
The Event needs to be first defined on the Portal. Once defined on Portal side, it can be accepted by Mobile Messaging SDK integrated within your mobile app.

According to this event definition, the resulting event can be initialized within your app as follows:
val definitionId = "EventExample"
val properties: MutableMap<String, CustomAttributeValue> = HashMap()
properties["itemCode"] = CustomAttributeValue("I-001")
properties["amount"] = CustomAttributeValue(1500.5)
properties["purchaseDate"] = CustomAttributeValue(Date())
properties["isPremiumUser"] = CustomAttributeValue(true)

val event = CustomEvent(definitionId, properties)
expand to see Java code
String definitionId = "EventExample";
Map<String, CustomAttributeValue> properties = new HashMap<>();
properties.put("itemCode", new CustomAttributeValue("I-001"));
properties.put("amount", new CustomAttributeValue(1500.5));
properties.put("purchaseDate", new CustomAttributeValue(new Date()));
properties.put("isPremiumUser", new CustomAttributeValue(true));

CustomEvent event = new CustomEvent(definitionId, properties);
In order to send the event to the server, you have two options to choose from:
-
Using
submitEventAPI with a callback argument in case you need to immediately send an event to the server:MobileMessaging.getInstance(context).submitEvent(event, object : ResultListener<CustomEvent>() { override fun onResult(result: Result<CustomEvent, MobileMessagingError>) { if (!result.isSuccess && result.error != null) { // handle error return } } })
in this case you have to handle possible connection or server errors, do retries yourself.expand to see Java code
    MobileMessaging.getInstance(context).submitEvent(event, new MobileMessaging.ResultListener<CustomEvent>(){
        @Override
        public void onResult(Result<CustomEvent, MobileMessagingError> result) {
            if (!result.isSuccess() && result.getError() != null) {
                // handle error
                return;
            }
        }
    });
-
Using
submitEventAPI without the callback argument:MobileMessaging.getInstance(context).submitEvent(event)in this case the Mobile Messaging SDK will eventually send the event to the server, it will also handle possible errors and do retries for you.expand to see Java code
MobileMessaging.getInstance(context).submitEvent(event);
After the successful submission, the new event will appear in the Person screen, under the Events tab:

Please note the "App Launch" and "Install" events on the screenshot above - these events are not custom ones but our internal standard events, the Mobile Messaging SDK submits them automatically for you. Full list of standard events is: "App Launch", "Install", "Uninstall", "Personalize", "Depersonalize".
If you have any questions or suggestions, feel free to send an email to [email protected] or create an issue.
- Library events
- Server errors
- Users and installations
- Messages and notifications management
- Inbox
Geofencing API- DEPRECATED- Android Manifest components
- Privacy settings
- In-app chat
- Infobip RTC calls and UI
- Backup rules