
This page provides resources for:
- TUTORIALS: video tutorials that demonstrate various aspects of using the code base.
- HOW-TO-GUIDES: step-by-step user guidelines for using DeepLabCut on your own datasets (or on demo data)
- EXPLANATIONS: resources on understanding how DeepLabCut works
- REFERENCES: read the science behind DeepLabCut
🎥 Getting Started: a video tutorial on navigating the documentation!
-
a set of videos that span the types of behaviors you want to track. Having 10 videos that include different backgrounds, different individuals, and different postures is MUCH better than 1 or 2 videos of 1 or 2 different individuals (i.e. 10-20 frames from each of 10 videos is much better than 50-100 frames from 2 videos).
-
minimally, a computer w/a CPU. If you want to use DeepLabCut on your own computer for many experiments, then you should get an NVIDIA GPU. See technical specs here. You can also use cloud computing resources, including COLAB (see how).
-
no specific cameras/videos are required; color, monochrome, etc., is all fine. If you can see what you want to measure, then this will work for you (given enough labeled data).
-
no specific computer is required (but see recommendations above), our software works on Linux, Windows, and MacOS, although we recommend Ubuntu.
- 💜 Overview of the entire DLC workflow
- 💙 Important Information on how to use DLC in different scenarios (single vs multi animal)
- 💚 The different ways to use DLC: standalone GUI, Jupyter/COLAB Notebooks, and in the terminal.
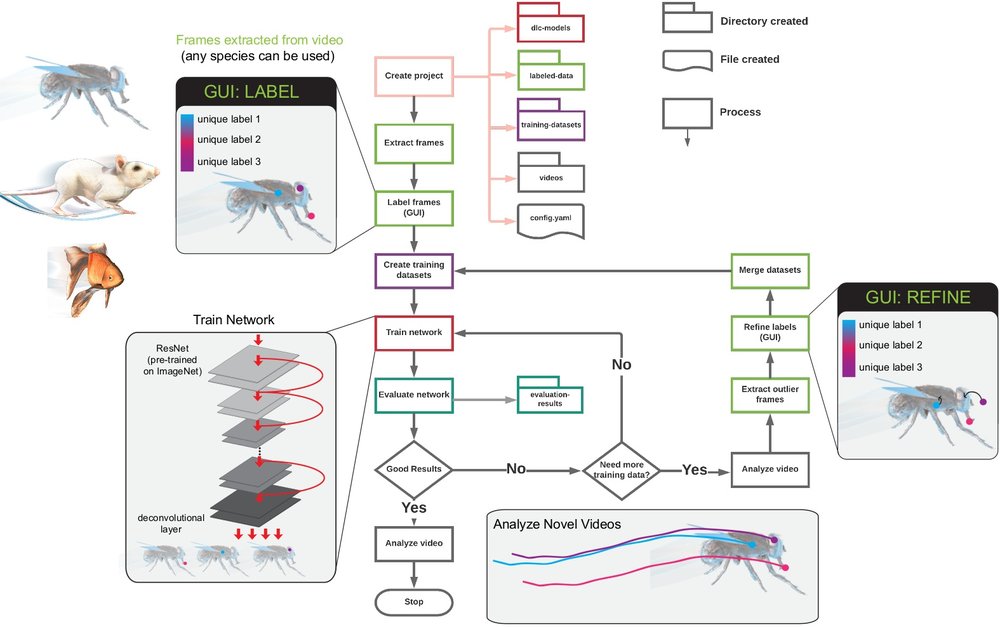
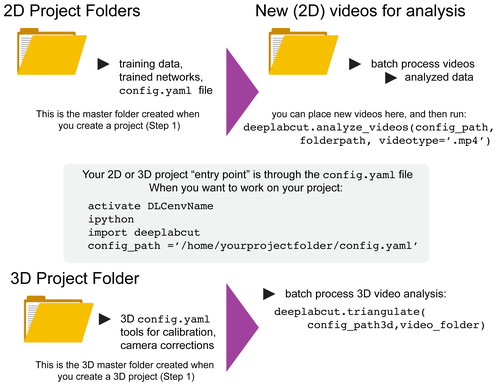
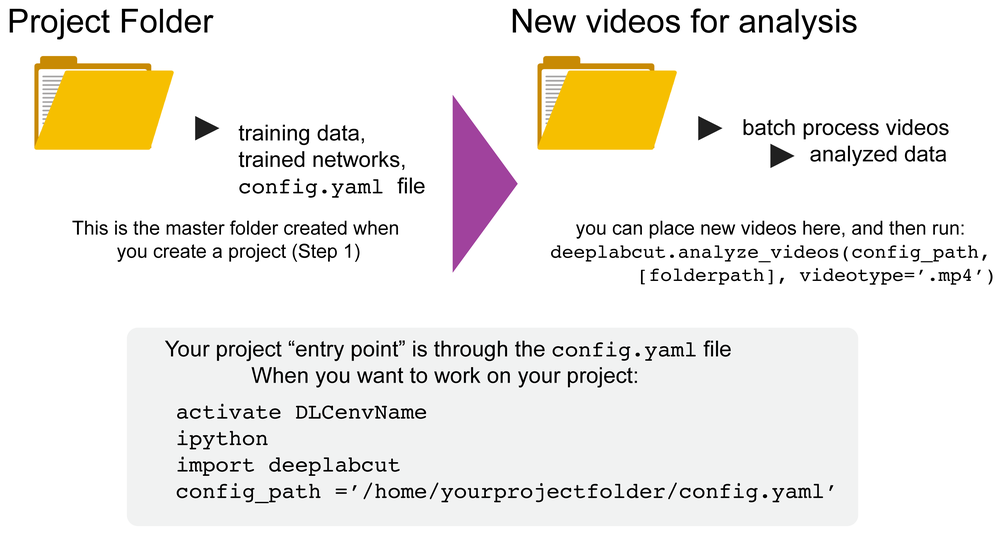
DeepLabCut is a software package for markerless pose estimation of animals performing various tasks. The software can manage multiple projects for various tasks. Each project is identified by the name of the project (e.g. TheBehavior), name of the experimenter (e.g. YourName), as well as the date at creation. This project folder holds a config.yaml (a text document) file containing various (project) parameters as well as links the data of the project.
NEW: We also have structured a getting started with DeepLabCut course here!

This page contains a list of the essential functions of DeepLabCut as well as demos. There are many optional parameters with each described function, which you can find here. For additional assistance, you can use the help function to better understand what each function does.

📣 NOTE: There is a highly similar workflow for 2.2+ (and your 2.X projects are still fully compatible with this format!).
💜 DLC 2.2: as of 2.2 we support "multi-animal projects," but these new features can also be used on single animals too (details below). The workflow is highly similar, but with a few key additional steps. Please carefully review the functions below for more details. You can search/look for maDeepLabCut for specific steps that are changed.

You can have as many projects on your computer as you wish. You can have DeepLabCut installed in an environment and always exit and return to this environment to run the code. You just need to point to the correct config.yaml file to jump back in! The documentation below will take you through the individual steps.
We recommend first using DeepLabCut for a single animal scenario to understand the workflow - even if it's just our demo data. Multi-animal tracking is more complex - i.e. it has several decisions the user needs to make. Then, when you are ready you can jump into 2.2...
We highly recommend using 2.2 first in the Project Manager GUI (Option 3). This will allow you to get used to the additional steps by being walked through the process. Then, you can always use all the functions in your favorite IDE, notebooks, etc.
- I have single animal videos, but I want to use DLC2.2:
- quick start: when you
create_new projectjust set the flagmultianimal=True.
- quick start: when you
- I have multiple identical-looking animals in my videos and I need to use DLC2.2:
- quick start: when you
create_new projectset the flagmultianimal=True. If you can't tell them apart, you can assign the "individual" ID to any animal in each frame. See this labeling w/2.2 demo video
- quick start: when you
- I have multiple animals, but I can tell them apart, in my videos and want to use DLC2.2:
- quick start: when you
create_new projectset the flagmultianimal=True. And always label the "individual" ID name the same; i.e. if you have mouse1 and mouse2 but mouse2 always has a miniscope, in every frame label mouse2 consistently. See this labeling w/2.2 demo video
- quick start: when you
🎥 VIDEO TUTORIAL AVAILABLE! - ALSO, if you can tell them apart, label animals them consistently!
- I have a pre-2.2 single animal project, but I want to use 2.2:
Please read this convert 2 maDLC guide
Great - now that you get the overall workflow let's jump in! Here, you have several options.
Option 1 DEMOs: for a quick introduction to DLC on our data.
Option 2 Standalone GUI: is the perfect place for beginners who want to start using DeepLabCut on your own data.
Option 3 In the terminal: is best for more advanced users, as with the terminal interface you get the most versatility and options.
We provide Jupyter and COLAB notebooks for using DeepLabCut on both a pre-labeled dataset, and on the end user’s own dataset. See all the demo's here! Please note that GUIs are not easily supported in Jupyter in MacOS, as you need a framework build of python. While it's possible to launch them with a few tweaks, we recommend using the Project Manager GUI or terminal, so please follow the instructions below.
🎥 VIDEO TUTORIAL! 🎥 VIDEO TUTORIAL#2!
Start iPython, or if you are using MacOS, you must use pythonw vs. typing ipython or python, but otherwise it's the same.
If you are using DeepLabCut on the cloud, you cannot use the GUIs and you need to first set DLClight=True. If you use Windows, please always open the terminal with administrator privileges. Please read more here, and in our Nature Protocols paper here. And, see our troubleshooting wiki.
Open an ipython session, import the package, and launch by typing in the terminal:
ipython
import deeplabcut
deeplabcut.launch_dlc()
Or, simply open the terminal and type:
python -m deeplabcutThat's it! Follow the GUI for details
Start iPython, or if you are using MacOS, you must use pythonw vs. typing ipython or python, but otherwise it's the same.
If you are using DeepLabCut on the cloud, you cannot use the GUIs and you need to first set DLClight=True. If you use Windows, please always open the terminal with administrator privileges. Please read more here, and in our Nature Protocols paper here. And, see our troubleshooting wiki.
Open an ipython session and import the package by typing in the terminal:
ipython
import deeplabcut
TIP: for every function there is a associated help document that can be viewed by adding a ? after the function name; i.e. deeplabcut.create_new_project?. To exit this help screen, type :q.
deeplabcut.create_new_project('ProjectName','YourName', ['/usr/FullPath/OfVideo1.avi', '/usr/FullPath/OfVideo2.avi', '/usr/FullPath/OfVideo1.avi'],
              copy_videos=True/False, multianimal=True/False)
Tip: if you want to place the project folder somewhere please pass : working_directory = 'FullPathOftheworkingDirectory'
maDeepLabCut: As of 2.2 when you create a project also pass: multianimal=True. Even if you don't have multiple animals, but want to use the added tools, you can set this to be true.
- Note, if you are a Ubuntu user the path should look like:
['/home/username/yourFolder/video1.mp4']; if you are a Windows user, it should look like:[r'C:\username\yourFolder\video1.mp4'] - Note, you can also put
config_path =in front of the above line to create the path to the config.yaml that is used in the next step, i.e.config_path=deeplabcut.create_project(...))- If you do not, we recommend setting a variable so this can be easily used! Once you run this step, the conig_path is printed for you once you run this line, so set a variable for ease of use, i.e. something like:
config_path = '/thefulloutputpath/config.yaml'- just be mindful of the formatting for Windows vs. Linux, see below.
(more details here)
- open the config.yaml file (in a text editor (like atom, gedit, vim etc.)), which can be found in the subfolder created when you set your project name, to change parameters and identify label names! This is a crucial step.
maDeepLabCut: As of 2.2 you also must modify a few more parameters in the config.yaml file, see here.
(PLEASE see more details here)
- set the config_path (LINUX):
config_path = '/home/computername/DeepLabCut/yourprojectname/config.yaml'- set the config_path (WINDOWS):
config_path = r'C:\home\computername\DeepLabCut\yourprojectname\config.yaml'- or you already set it as a variable in step "create_new_project" directly above.
mini-demo: create project and edit the yaml file

deeplabcut.extract_frames(config_path, mode='automatic', algo='kmeans', crop=True/False)(more details here) *update: as of 2.0.5 (spring 2019) checkcropping=True is dropped; you now just have the option to directly draw a rectangle over the image to crop before extraction (i.e. there no need to manually change in config.yaml then check).
deeplabcut.label_frames(config_path)maDeepLabCut: As of 2.2 there is a new multi-animal labeling GUI (as long as in your config.yaml says multianimalproject: true at the top, this will automatically launch).
(more details here)
mini-demo: using the GUI to label

deeplabcut.check_labels(config_path)maDeepLabCut: you can also look at both bodypart labeling (standard) and individual IDs by also passing visualizeindividuals=True
(more details here)
- Note, we also have a new, optional, functional to crop frames /labels for more efficient training. You can call this before you create a training dataset by:
deeplabcut.cropimagesandlabels(path_config_file, userfeedback=False)If you did not do this already be sure to define a skeleton in the config.yaml - See more here for cruical details.
There is also a graphical way to define your skeleton:
deeplabcut.SkeletonBuilder(config_path)

deeplabcut.create_training_dataset(config_path)or to compare different neural networks use:
deeplabcut.create_training_model_comparision(config_path, num_shuffles=1, net_types=['resnet_50'], augmenter_types=['default', 'imgaug'] )maDeepLabCut:
For mutli-animal training we use batch processing. This means that we'd like the data to be similarly sized. You can of course have differing size of images you label (and we suggest cropping out useless pixels!). So, we have a new function that can pre-process your data to be compatible with batch training. Please run this function before you create_multianmialtraining_dataset:
deeplabcut.cropimagesandlabels(path_config_file)Then run:
deeplabcut.create_multianimaltraining_dataset(path_config_file, allow_growth=True)(more details here)
deeplabcut.train_network(config_path)(more details here)
Here, for traditional projects you will get a pixel distance metric and you should inspect the individual frames:
deeplabcut.evaluate_network(config_path, plotting=True)maDeepLabCut [CRITICAL POINT]:
You need to cross validate parameters before inference. Here, you will run the new function:
deeplabcut.evaluate_multianimal_crossvalidate(config_path, Shuffles=[1], edgewisecondition=True, leastbpts=1, init_points=20, n_iter=50)We highly suggest that you read the docstring for this function to edit inputs appropriately.
maDeepLabCut: (or on normal projects!)
You can also plot the scoremaps, locref layers, and PAFs:
deeplabcut.extract_save_all_maps(path_config_file, shuffle=shuffle, Indices=[0, 5])- you can drop "Indices" to run this on all training/testing images (this is slow!)
(more details here)
- Please note that novel videos DO NOT need to be added to the config.yaml file. You can simply have a folder elsewhere on your computer and pass the video folder (then it will analyze all videos of the specified type (i.e.
videotype='.mp4'), or pass the path to the folder or exact video(s) you wish to analyze:
deeplabcut.analyze_videos(config_path,['/fullpath/project/videos/'], videotype='.mp4', save_as_csv = True)maDeepLabCut: there is a new step that allows you to plot all detections first. This allows you to check the pose-estimation quality before tracking of individuals! We recommend doing this step when you are running quality checks on new videos, etc. Once you have optimized pose-estimation and tracking, this is not required. scorername can be gotten from scorername = deeplabcut.analyze_videos (...) or just looking at the name of the DLC scorer in the folder name, h5 file, etc.
deeplabcut.create_video_with_all_detections(path_config_file, ['videofile_path'], scorername)- Now that you have detections (which are saved as a pickle file, not h5, btw), we need to assemble and track the animals.
First, you need to convert detections to tracklets. This step has several tracker types (track_method), and we recommend testing which one works best on your data.
deeplabcut.convert_detections2tracklets(path_config_file, ['videofile_path'], videotype='mp4',
                                                    shuffle=1, trainingsetindex=0, track_method='')
You should cross-validate the tracking parameters. (Here is more information). Namely, you can iteratively change the parameters, run convert_detections2tracklets then load them in the GUI (refine_tracklets). Note, that in the main Project Manager GUI there is a button for you to launch the inference file to seemlessly edit and rapidly test.
Secondly, you need to refine the tracklets. You can fix both "major" ID swaps, i.e. perhaps when animals cross, and you can micro-refine the individual body points. You will load the ...trackertype.pickle file that was created above, and then you can launch a GUI to interactively refine the data. This also has several options, so please check out the docstring. Upon saving the refined tracks you get an .h5 file (akin to what you might be used to from standard DLC. You can also load (1) filter this to take care of small jitters, and (2) load this .h5 this to refine (again) in case you find another issue, etc!
deeplabcut.refine_tracklets(path_config_file, pickle_or_h5_file, videofile_path, min_swap_frac=0.0, min_tracklet_frac=0.0, trail_len=50)Short demo:

Firstly, Here are some tips for scaling up your video analysis, including looping over many folders for batch processing: https://github.com/AlexEMG/DeepLabCut/wiki/Batch-Processing-your-Analysis
You can also filter the predicted bodyparts by:
deeplabcut.filterpredictions(config_path,['/fullpath/project/videos/reachingvideo1.avi'])Note, this creates a file with the ending filtered.h5 that you can use for further analysis. This filtering step has many parameters, so please see the full docstring by typing: deeplabcut.filterpredictions?
-
NOTE 💡📣: Before you create a video, you should set what threshold to use for plotting. This is set in the
config.yamlfile aspcutoff- if you have a well trained network, this should be high, i.e. set it to0.8or higher! -
You can also determine a good
pcutoffvalue by looking at the likelihood plot created duringplot_trajectories:
Plot the outputs:
deeplabcut.plot_trajectories(config_path,['/fullpath/project/videos/reachingvideo1.avi'],filtered = True)Create videos:
deeplabcut.create_labeled_video(config_path, [`/analysis/project/videos/reachingvideo1.avi','/fullpath/project/videos/reachingvideo2.avi'],filtered = True)(more details here)
deeplabcut.extract_outlier_frames(config_path,['full/videofile_path'])(more details here)
(refinement and augmentation of the training dataset)
deeplabcut.refine_labels(config_path)mini-demo: using the refinement GUI, a user can load the file then zoom, pan, and edit and/or remove points:

When done editing the labels, merge: PRO TIP: if you added new data, even without refining, i.e. you added and labeled frames from new videos, also use merge before creating a new training data set!
deeplabcut.merge_datasets(config_path)Now, create a new training set and re-train (same steps as above)! i.e.
deeplabcut.create_training_dataset(config_path)
deeplabcut.train_network(config_path)
(more details here)
In ipython/Jupyter notebook:
deeplabcut.nameofthefunction?
In python or pythonw:
help(deeplabcut.nameofthefunction)
You can always exit an conda environment and easily jump back into a project by simply:
Linux/MacOS formatting example:
source activate yourdeeplabcutEnvName
ipython or pythonw
import deeplabcut
config_path ='/home/yourprojectfolder/config.yaml'
Windows formatting example:
activate yourdeeplabcutEnvName
ipython
import deeplabcut
config_path = r'C:\home\yourprojectfolder\config.yaml'
Now, you can run any of the functions described in this documentation.
There is also helper code to further analyze your data or scale up analysis here: https://github.com/AlexEMG/DLCutils/
Return to readme.