General Administration Guide
Depending on how you have executed nGrinder, you may use a different URL to access the main page. If you run agent with java -jar ngrinder-controller-X.X.war, You may be able to access the first page by moving to the following URL
Once you access the URL, you can see the log in page.

nGrinder creates 4 users at the first run. The predefined IDs are as follows.
Each has name that reflects its role.
- admin, user, superuser, system
- Initial password is the same as name
There are 4 user types (referred to as Roles)
| Role | Description |
|---|---|
| ADMIN | Manage nGrinder system including : User Management, Test Observation, Test Report Statistics and Agent Management, etc. |
| USER | Test script, and then get its report data files. |
| SYSTEM_USER | Reserved for internal use |
| SUPER_USER | Observe whole tests executed in nGrinder instance but can not configure the system. |
To configure the system, you need to log in with an admin account.
NOTE: Please don’t forget to change your password when you log in for the first time. If you leave your account with the default password, your nGrinder instance can be used by a hacker for a DDOS attack.
Agent management in the admin menu offers agent operation and monitoring functions. Even when you have configured the agent to connect the controller, you need to approve each agent in the controller to make it effective. This step is required to prevent abnormal agents trying to connect to the controller from abusing the controller.

If you are admin, the menu above should be visible. You can click the Agent Management menu to manage agents.

Then, you should see the screen shown above. This shows the statuses of the attached agent. If we just allow all agent connections, there would be a potential risk. For this reason, nGrinder only uses approved agents. If you confirm that the agents listed here are OK, you can approve them. Some agents can be only used for specific users. Please refer to User Agent for details.
You can monitor agent performance status by clicking each IP.
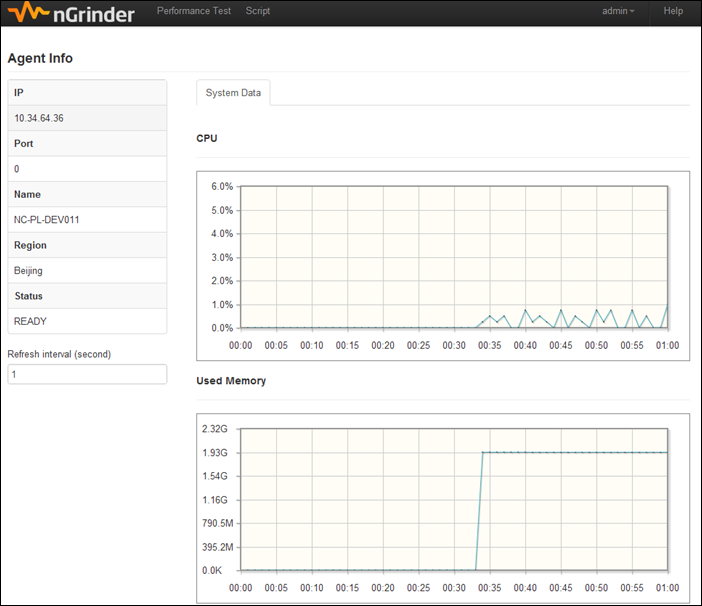
This graph shows the performance of each agent in the last 1 minute.
From nGrinder 3.3, agent management page includes the agent auto update feature. See Agent Auto Update for detail.
Admin can create/delete and modify users through the user management menu. Each user can also modify his/her own profile as well.

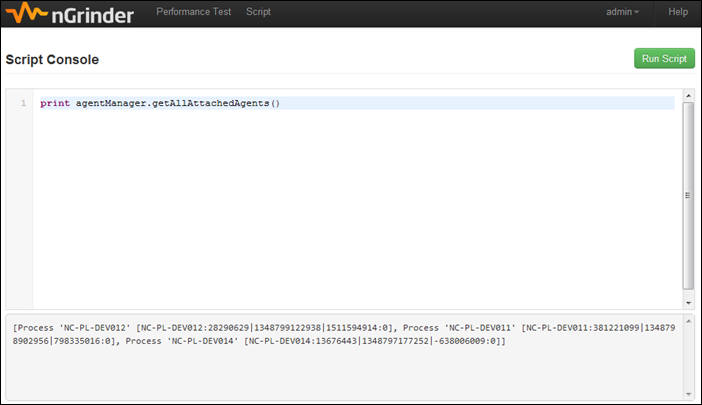
This is a useful admin tool for debugging. Admin can input Groovy code to monitor and control nGrinder internal status. for example:
println(agentManager.getAllAttachedAgents())This feature is disabled by default. To enable the script console, put the following option in the system configuration.
controller.enable_script_console=falseIt is important to know what you can refer in the script. The following variables are available.
- applicationContext (org.springframework.context.ApplicationContext)
- agentManager (org.ngrinder.perftest.service.AgentManager)
- agentManagerService (org.ngrinder.agent.service.AgentManagerService)
- regionService(org.ngrinder.region.service.RegionService)
- consoleManager (org.ngrinder.perftest.service.ConsoleManager)
- userService (org.ngrinder.user.service.UserService)
- perfTestService (org.ngrinder.perftest.service.PerfTestService)
- tagService(org.ngrinder.perftest.service.TagService)
- fileEntryService (org.ngrinder.script.service.FileEntryService)
- config (org.ngrinder.infra.config.Config)
- pluginManager (org.ngrinder.infra.plugin.PluginManager)
- cacheManager(org.springframework.cache.CacheManager)
Please refer to nGrinder javadoc to learn the available classes and methods.
Sometime it’s important to see the server log to identify a problem and send a bug reports to the developers. Instead of catalina.out which tomcat uses by default, nGrinder intercepts the logging system and writes a log in the ${NGRINDER_HOME}/logs/ngrinder.log file.You can see the currently printing logs in the Log Monitoring menu. This is refreshed every 5 seconds in order to show the latest available logs.
Log monitoring is available in the not cluster mode.

Sometimes, you need to configure whole test execution policy. For example, you can set the maximum count of agents that each test can use. Or you can limit the max concurrent number of tests to minimize network loads. These kinds of policies can be configured by configuring the ${NGRINDER_HOME}/system.properties file.